Two-Storey and Duplex 3D House Plans: Align Floors Before Styling
Plan two-storey and duplex homes with clear floor labels, 2,000 sq ft area comparisons, a 20 × 50 concept brief, stair coordination, and practical checks.
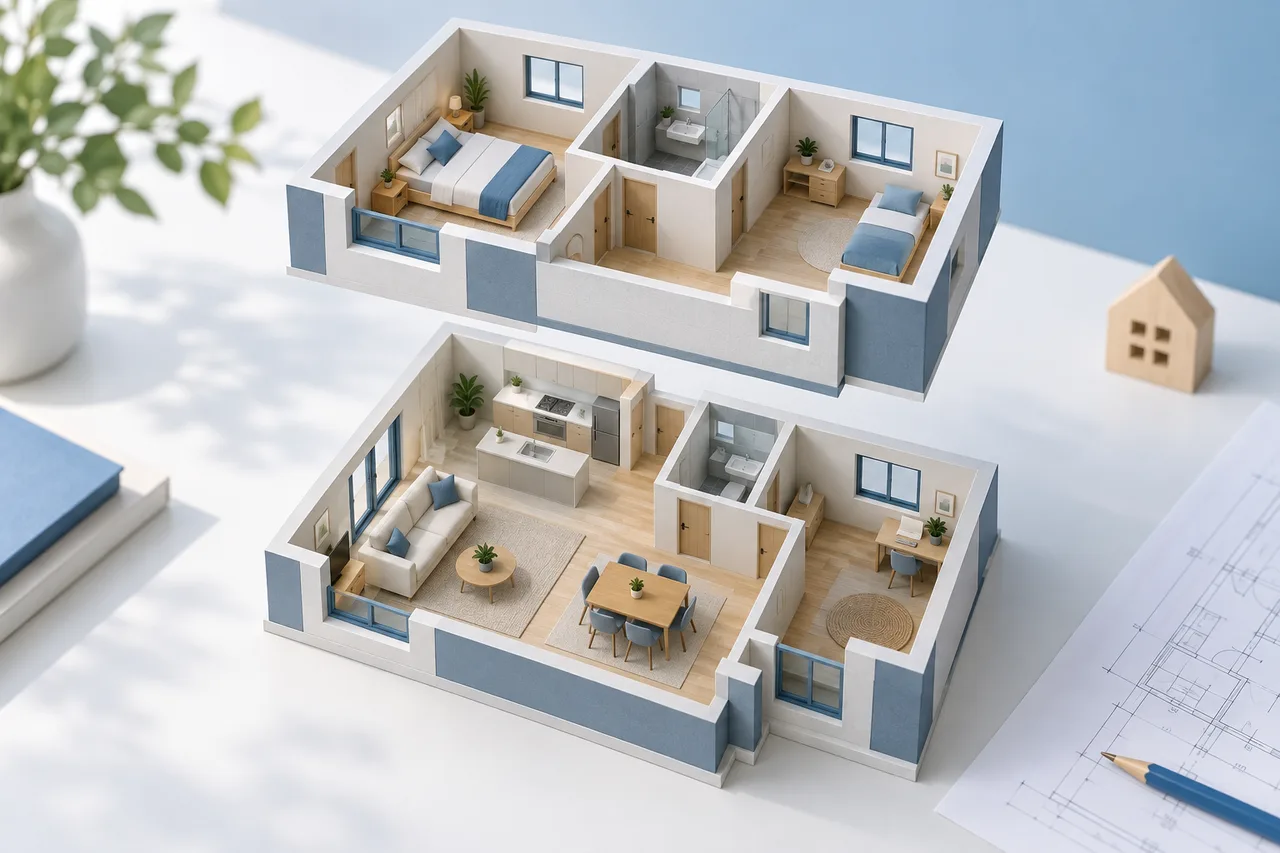
A two-storey house is more than two attractive plans placed on top of each other. The stair must arrive in the right place, openings must align with the intended structure, bathrooms need workable services, and the upper floor must relate to the same site and orientation as the lower one. Styling the rooms before those questions are settled can make a convincing image of an unresolved building.
This guide explains how to compare two-level concepts, including a 20 × 50 ft three-bedroom brief and the common 2,000-square-foot search. The examples are deliberately transparent about their assumptions. They help organize a planning discussion; they are not construction-ready designs, structural assessments, or proof of local permission.
Clarify “duplex,” “double floor,” and floor names
“Duplex” has several regional meanings. It can describe one dwelling occupying two levels, two separate dwellings in one building, or another local property type. A four-bedroom duplex plan in 3D may therefore refer to one four-bedroom home over two storeys or a building containing separate homes. Ask which meaning applies before using the plan.
Similarly, “3D house design double floor” and “home design two floor 3D” usually express a wish for two levels, but do not explain how they are occupied. State whether there is one household, two independent households, a rental unit, or a future subdivision proposal. Those choices change access, privacy, services, and the relevant professional checks.
Floor numbering also varies. In some places the first floor is the entry level; in others it is the level above the ground floor. Label drawings by both use and position: “entry level / lower floor” and “upper floor above entry,” with elevations if known. A file called “first floor 3D plan” is too ambiguous for coordinating a real project.
Does 2,000 square feet mean total or per floor?
A search for 3D house plans in 2,000 sq ft can describe at least three different things: a 2,000 sq ft plot, a home with 2,000 sq ft total floor area, or a building with 2,000 sq ft on each level. Those are very different projects.
The conversion is 1 sq ft = 0.09290304 m²:
| Meaning of the stated figure | Arithmetic comparison |
|---|---|
| 2,000 sq ft plot | 185.81 m² of land; permitted footprint is not established |
| 2,000 sq ft total over two equal levels | 1,000 sq ft per level in a simplified budget, about 92.90 m² each |
| 2,000 sq ft on each of two levels | 4,000 sq ft combined, about 371.61 m² |
The middle row is a budgeting assumption, not a rule that the floors must be equal. Actual area definitions may handle walls, stair openings, voids, and covered spaces differently. Obtain the measurement convention before comparing totals from listings, drawings, or quotations.
Write the intended figure beside every early sketch: “2,000 sq ft total, including the stated wall allowance, excluding outdoor terraces.” If stair openings or other areas remain unresolved, identify them separately rather than presenting a precise certified total.
A 20 × 50 ft plot with a three-bedroom brief
The query often written “20 * 50 house plan 3BHK duplex” describes an assumed 20 × 50 ft plot: 1,000 sq ft of land, about 92.90 m². BHK means bedroom, hall, and kitchen in the listing convention that uses it. Here, assume one dwelling over two levels with three bedrooms in total, plus shared living and kitchen spaces.
Begin with the verified site constraints. Suppose, purely for a comparison, the resulting building envelope is 18 × 40 ft. That 720 sq ft rectangle is an assumed input, not a recommendation for setbacks or coverage. Two identical bounding rectangles would nominally total 1,440 sq ft, about 133.78 m², before resolving openings and the chosen area definition.
One arrangement puts one bedroom on the entry level and two upstairs. This can support a visitor, a resident who prefers to avoid stairs, or a quiet room separated from the upper bedrooms. The lower bedroom's suitability still depends on its actual dimensions, windows, access, and the project requirements.
Another arrangement places all three bedrooms upstairs and keeps shared life downstairs. That can create a clearer public-private division, but every bedroom occupant then depends on the stair. Compare the household's current and likely future routines before choosing.
Do not assume the example envelope provides enough space for either arrangement. Build a room schedule, include stairs and circulation from the start, and test it against the real outline. If it does not fit, revise the brief rather than letting a 3D image hide the shortage.
Put the stair on both drawings first
A staircase consumes space on the lower level, affects the upper floor opening, and requires appropriate headroom, landings, guarding, handrails, and other project-specific details. A decorative stair icon does not establish any of those conditions.
To see why the geometry matters, consider arithmetic alone. A hypothetical floor-to-floor rise of 2.88 m divided into 16 equal risers gives 0.18 m per riser. A simple straight flight with 15 treads at an assumed 0.27 m going would have a 4.05 m horizontal run before landings and surrounding circulation. These numbers illustrate a calculation; they are not a recommended or compliant stair design.
A different arrangement changes the geometry. A turning stair involves landings or other detailed conditions, and the upper opening must account for the actual stair configuration and headroom. Floor thickness and structure also affect that opening. Have an appropriately qualified local designer resolve the stair against the applicable requirements.
In the concept, reserve its position on both floors and label the direction of travel. Then trace what happens on arrival upstairs. A landing that forces people through a bedroom is a layout issue worth discovering before adding furniture finishes.
Align the floors with a shared reference
Choose fixed reference lines that appear on both drawings, such as verified exterior corners and a common axis. Keep the same units, orientation, and scale. An upper floor rotated for a prettier presentation is difficult to compare with the actual level below it.
Record dimensions consistently. Measuring the lower level to exterior wall faces and the upper level to clear internal faces can create apparent alignment that disappears when wall thickness is considered. Use the floor plan scale calculator when preparing a reliable scaled reference, and document the convention you use.
For each level, list the outer dimensions, stair opening position, significant structural references, major openings, and service zones. Identify discrepancies as unresolved questions. The drawing should not imply that upper walls can stand anywhere simply because the 3D preview allows you to place them there.
The structure, foundations, lateral stability, and load paths need appropriate professional design. Floor alignment helps reveal coordination questions; it does not answer those engineering questions itself.
Stack services thoughtfully without inventing a plumbing design
Locating an upper bathroom near a lower service zone can be a useful early coordination idea. It does not automatically prove that drainage falls, ventilation, supply routes, maintenance access, waterproofing, or structural penetrations will work.
Mark the intended wet spaces on both plans and discuss possible routes with the relevant professionals. Avoid hiding an assumed pipe route inside a wall simply because it is convenient in the model. The wall may not have the required space or construction, and the route may conflict with the structure below.
Think about daily noise as well. An upstairs bathroom near a sleeping area or drainage near a quiet study may require more careful detailing. Planning the relationship early gives the project team a chance to resolve it coherently.
A four-bedroom home needs more than another upstairs label
For a four-bedroom duplex plan, first decide the distribution. One lower bedroom and three upper bedrooms might suit a multigenerational household. Two on each level might serve a different routine. Four upstairs can simplify separation from living spaces but increases dependence on the stairs.
For each option, compare bathroom access, laundry routes, shared space, storage, and who uses the stair at busy times. A fourth bedroom may make the house less comfortable if its area is taken entirely from dining or circulation.
Also decide whether the bedroom count includes a room intended mainly as an office. A flexible room can serve different uses at different times, but it cannot be promised simultaneously as everyone's private workplace and a permanent bedroom. Its classification and suitability require separate checks.
The three- and four-bedroom bungalow guide provides single-level area budgets that help test the household brief. Compare the activities and shared spaces, while recognizing that a two-storey house has different stair and coordination needs.
Use separate floor models honestly
In 3DHouseMaker, plan each level separately. The current tools support concept room and wall planning, while the converter provides an extruded wall preview from a suitable source drawing. They do not assemble a coordinated multi-floor building information model or verify structural and service connections between floors.
Use the floor plan creator for each measured level, keeping a shared reference and clear file names. Save the lower and upper versions with the same revision identifier so that an old upper floor is not accidentally compared with a new lower one.
If working from images, use the floor plan to 3D converter separately for each floor. Verify the scale and detected walls against each source. Two successful conversions do not prove that the floors align; compare their dimensions and reference positions explicitly.
Keep the roof, terrain, site, and external appearance questions in a separate record. A roofless wall preview is useful for understanding rooms, but it does not represent a complete two-storey building design.
Run a household review before choosing a facade
Walk through three routines on paper: arriving with shopping, getting everyone ready in the morning, and using the house when someone is resting. Include stair journeys, bathroom access, laundry, and the route to outside. Test what changes if an occupant temporarily cannot use stairs.
Review privacy between levels too. An open stair near living space can make the house feel connected, but sound and sight lines may reach sleeping areas. A more enclosed arrangement can change the experience and consume different circulation space. Record the household's preference and the associated design questions.
Finish with a coordination checklist: one agreed meaning of duplex; unambiguous floor labels; total versus per-level area; verified plot envelope; matching reference lines; stair and opening information; bedroom distribution; services questions; and unresolved structural and local reviews. A credible two-storey 3D concept is one whose levels make sense together, even before the facade is styled.